|
|
Post by Rowan on Jun 8, 2022 18:37:35 GMT
Hi Peter, welcome! Any photos of the car?  Rather than sending the details as an email I should probably actually do a post here on it... |
|
|
|
Post by Rowan on May 29, 2022 13:16:08 GMT
Replicated! Looks like that broke in the last app update. I'll take a look at fixing it.
While the GPS speed is out of action in the app. In the mean time the best course of action would probably be to work out why the speed input circuit isn't working - I'm afraid to say that will probably be quicker than an app update.
|
|
|
|
Post by Rowan on May 25, 2022 20:36:23 GMT
Nope, that should give you the GPS speed on the display! I'll take a look into it tomorrow, see if I can replicate it.
|
|
|
|
Post by Rowan on May 25, 2022 13:29:20 GMT
By GPS mode, you mean if you've selected the 'Display GPS Speed' in the app settings?
|
|
|
|
Post by Rowan on May 25, 2022 6:51:52 GMT
Hey - The speed in the app changes colour depending on it's value, being greyed out doesn't actually mean very much. There isn't a method to disable it in code, it just displays a value if it receives one.
My first port of call would be tracing the signal back on the PCB, checking that you have continuity between the terminal and R19, the other side of R19 has continuity to pin 3 on the Arduino and that the resistor values are correct etc.
|
|
|
|
Post by Rowan on Mar 31, 2022 13:00:33 GMT
I've just been looking into these as an alternative: www.digikey.co.uk/en/products/detail/tamura/L37S200S05M/11696425Still lower accuracy as none of the 50A ones are in stock anywhere, but cheaper than the LEM option. The caveat is that I've not tried them! The datasheet indicates they should work fine... but it's all theory until it's tested. |
|
|
|
Post by Rowan on Mar 30, 2022 12:36:41 GMT
Ah, I'm afraid that does sound like a damaged current sensor!
The 100p or 150p would work but the resolution would be lower... I've not tried them yet, but I presume you're having the same trouble I am around sourcing new sensors?
|
|
|
|
Post by Rowan on Mar 28, 2022 14:15:42 GMT
Aaand kits are out of stock again, that last 20 sold like hot cakes!
Since I sourced the last kits, prices and especially postage costs and delays from China have skyrocketed. There is also a continued shortage of the LEM current sensors that we use. I'm afraid the kit quantities will remain low as I find and buy the remaining reasonably priced UK stock of the current sensors, and the cost is going to jump significantly.
The small compensation for this is that it is no longer cost efficient to source unbranded arduino clones, so I'll try to supply genuine Arduino Nano Every boards with the new kits! For reference that's approximately an 8x cost increase on the Arduino...
For those that want to be a bit more involved and keep costs down, I'll try to provide an octopart BOM which should help significantly with component sourcing when buying a bare PCB. You might struggle for the LEM HAIS 50-P current sensors though!
|
|
|
|
Post by Rowan on Mar 22, 2022 14:47:47 GMT
Hi Thawney, The LEM current sensors are pretty robust - forgive the basic questions, but I'll start with the basics and work my way through. First, measure between GND and 5v on the current sensor breakout board with everything plugged in (Careful not to short anything with the multimeter!) and verify that it is receiving +5V. (If it isn't check that the connector at the eChook has 5V and the connections between are good) Next, check that the Ref and Out pins are each showing around 2.5v relative to ground. (If you have 5V, but either of those voltages are out, it's likely the current sensor is damaged) Next at the eChook connector for the current sensor, verify that you have the same ~2.5v relative to ground on each of the middle pins of the connector - measure on the screw heads. If everything has checked out so far the current sensor is probably working. Now let's look into the eChook board. For reference as we go through it, the current input circuit is in the documentation here: docs.echook.uk/circuit-schematics/current-inputFirst check is that the op-amp (labelled as U3 on the PCB) is in the correct orientation, the dimple in the chip should be closest to the connector as shown below:  The pin numbering on the chip is: 1-|*U |-8
2-| |-7
3-| |-6
4-|___|-5Check that there is 5V between pins 4 (GND) and 8 (+5v). Now de-power the board and check resistances there should be approximately - 10Kohm, between pins 1 and 2 - 10Kohm between 3 and 4 - 47kohm between pin 1, and pin A2 on the Arduino.If all the above has passed and you have a way of testing under load (probably just spinning up the motor), watch the sense and ref voltages with the multimeter - easiest on the eChook connector: 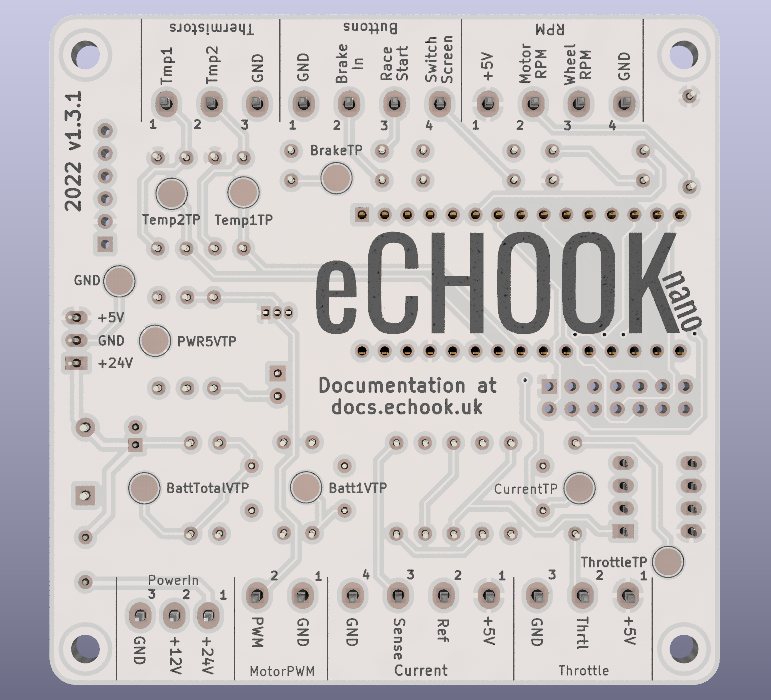 The sense voltage should increase with current and ref should stay the same. If the opposite happens you've either got your wires swapped or the current sensor the wrong way around. Swap the sense and ref wires to fix it. If the sense voltage moves as expected, now measure the the voltage between ground and the Current test point (CurrentTP), that should start at ~0v and increase with current. If it doesn't move, but the sense voltage does, it points to a fault in the Op-amp circuit, either a faulty op-amp or a bad connection somewhere. If it does move and the eChook app still shows no current there's either an issue with the Arduino, or your calibration file (if the Current Multiplier is set to 0 it will always read 0) Hopefully that gives you plenty to get started with! Let me know how it goes. |
|
|
|
Post by Rowan on Mar 17, 2022 10:22:55 GMT
Thanks Keith. The only real benefit to using the Every at this point is if you're doing your own tweaking to the code (So you'll probably like it!). It might get you some communication peripherals on the expansion header too - I haven't done a proper comparison of the Atmega4809 ports to the Arduino pinout - the officially advertised features for Nano compatibility is a fraction of the features on the chip.
|
|
|
|
Post by Rowan on Mar 14, 2022 9:52:04 GMT
The eChook nano code has been updated for compatibility with the Arduino Nano Every. Download here.
Towards the end of 2019 the Arduino Nano Every was released as a successor to the venerable Arduino Nano. This is significantly cheaper (£11 at time of writing) than an older ATMEga328p based genuine Arduino Nano. There were two prompts for this update: 1. The 'Cheap Chinese' Arduino Nanos aren't looking quite so cheap with the current chip shortage. Where they used to be available for £1.50 you'll now be hard pressed to find one for under £5, and that's if you're buying a few. With this in mind it's hard to argue against going for a branded Arduino nano compatible board, such as the Maker Nano(£7) which has a useful array of led's and extra bits if you're using it for development or a DFRduino Nano, which is confusingly more expensive at £9, or indeed the Genuine Arduino Nano Every, for £12.50 (£11 without soldered headers), which has the benefit of supporting Arduino development. 2. One team (you know who you are  ) bought a batch of Arduino Nano Every boards for their eChooks, understandably believing the sales pitch of 100% compatible with the Arduino Nano, only to find they're not 100% compatible at all!
Code UpdatesThere are two major changes required to make the code compatible with the Arduino Nano Every. The biggest change is the Hardware serial port. The Atmega328p m icrocontroller on the old Nanos has a single hardware serial port which is shared with the USB programming interface and the TX and RX pins that are used for bluetooth communication. This was accessed in code via the Serial object.
The Arduino Nano Every uses a far more powerful and better featured ATmega4809 microcontroller that has multiple hardware serial ports, and uses different ports for the USB and the TX and RX pins. The USB serial is accessible through the Serial object, but the bluetooth data now needs to be sent out via the Serial1 object.
To achieve compatibility I've created a SerialA object and referenced it to either Serial or Serial1 depending on the selected target microcontroller using compiler directives:
#if defined(__AVR_ATmega4809__)
  #define NANO_EVERY
  // References Serial1 to SerialA for the Arduino Nano Every
  HardwareSerial &SerialA = Serial1;
#else
  // References Serial to SerialA for the Arduino Nano 328p
  HardwareSerial &SerialA = Serial;
#endif
When using the Every, data is sent to the bluetooth module, but is no longer available to the USB. On the plus side, this allows any debug messages to be sent out through the USB without them being lost in the binary data stream - a nice feature for development.
The other change involves interrupts. Every digital pin on the Every can be used as an interrupt, and when using the Arduino attachInterrupt() routine, they are identified by pin number, instead of interrupt number as on the old Nano. The same compiler directives have been used to set the interrupts depending on target microcontroller:
#ifdef NANO_EVERY
    attachInterrupt(2, motorSpeedISR, RISING);
    attachInterrupt(3, wheelSpeedISR, RISING);
#else
    attachInterrupt(0, motorSpeedISR, RISING);
    attachInterrupt(1, wheelSpeedISR, RISING);
#endif
I've taken the opportunity to make a few other small improvements to the code. Comments have been updated, some legacy code supporting the prototype eChook boards (v1.1) has been removed without breaking compatibility for them, and the handling of button presses has been improved making better use of the Bounce2 library features.
While there are no immediate benefits to using the Arduino Nano Every over an old Nano, it is a newer, faster and more feature rich microcontroller that could open some new avenues of development - it's a really nice little board. |
|
|
|
Post by Rowan on Nov 2, 2021 21:43:16 GMT
Update: Kits are back in stock : www.greenpower.co.uk/product/340Unfortunately, the kits are going to be out of stock in the Greenpower shop for a little while. They are coming back and I'll update this once we have a re-stocking date!
To our surprise, the chip shortage has had a big affect on the pricing from the suppler that we have been using for manufacture and kitting for the last few years. I suspect this is actually more to do with the supplier than the chip shortage, as some of their BOM quotes were very inflated compared to prices I could source components for, but they wouldn't budge.
As a result we're going through the process of getting quotes from new suppliers and working to get the kits back into stock, but have no dates - or prices - to share at the moment.
In the mean time, for anyone itching to get their hands on an eChook, we do have some PCBs left. You'll need to use the BOM in the documentation to order the rest of the components required. Message me here to order one, They'll £5 posted. (Although I need to buy some envelopes!)
Sorry for the inconvenience right as we go into the off season!
|
|
|
|
Post by Rowan on Sept 21, 2020 14:10:34 GMT
Apologies to anyone who saw that last spam post before I deleted it. Unfortunately we're getting increasing spam posts that are increasingly inappropriate, all through guest accounts, so I'm going to disable the 'post as guest' feature on the forum - hopefully it won't put genuine posters off posting!
|
|
|
|
Post by Rowan on Sept 17, 2020 10:11:35 GMT
Welcome! It's certainly been an odd year, good luck getting everything ready for Goodwood Hopefully most of the information for hooking up your eChook is in the documentation, but feel free to ask any questions here. |
|
|
|
Post by Rowan on Sept 17, 2020 10:03:12 GMT
Can't help with specific phones, but there shouldn't be any issues running the app on Go edition. It should run happily with android 5 onwards, although with smaller phones some of the data does get pushed off the screen currently.
A popular option with teams seems to be using an old discarded phone - they tend to be up to the task so long as the battery is ok still.
|
|


 ) bought a batch of Arduino Nano Every boards for their eChooks, understandably believing the sales pitch of 100% compatible with the Arduino Nano, only to find they're not 100% compatible at all!